
Quick Tips IMPROVE Series, Part 2: Modules Overview
Welcome back to Part 2 of our IMPROVE series. If you recall our acronym from our last post, you’ll remember that the M in IMPROVE stands for Modules Overview.
In this post, we will discuss the purpose of modules, how students navigate them, and how to create a module structure in your own courses.
Author note: This series is much more in depth than some of our previous RCID Quick Tips and focuses on universal course design as well as the Canvas tools themselves. While we broke this into several sections for emails, we've combined them for the blog to make it easier to navigate.
What are Modules?
Modules control the organization, sequencing, and pacing of your course and provide students with a linear path to navigate through and interact with your content. The Modules Index page serves as a course outline, so that students can see the entire structure of the course. As the instructor, you can control when modules become available to students.
Here is an example of what a complete module might look like in a photography course. Everything the students need to do -- read, watch videos, submit assignments -- are included as items in the module in sequence.

How do students navigate modules?
Students can navigate in two ways. They can use the Modules Index page as their starting point and click on individual module items as they need them. However, it’s likely that once students click on the first item in the module, they will progress sequentially by clicking on the Next button rather than continually returning to the Modules Index.
This means that we want to be strategic about the naming, order, grouping, and visual presentation of our content, so that as students move through each module, things are presented in a way that helps students to understand not only the content itself, but the purpose and relationships between pieces of content. We’ll talk more about this when we delve into Pages later in the series.

Tip: Try putting yourself in your students’ shoes by navigating through your modules in Student View. Once you click into a module, use the Next/Previous buttons to see how your content is presented when students navigate in this way.
How do I create a module structure in my course?
To start, we want to take a look at the course holistically. How can we break down the overall course content into smaller, more digestible pieces? Those discrete pieces or units equate to Canvas Modules.
Step 1: Break down your content
Generally, you would create one module for each unit of content in your course. Each module may focus on one major topic, or it could cover a group of related topics. In a history or art class, maybe each module covers a time period or era. In an English literature class, perhaps each module is centered around a novel.
Modules also relate to the pacing of the course. You might use one module per week, or a module may span multiple weeks.
The key is to figure out an organizational structure makes sense for your content and the way you teach your course. Once you do that, creating the modules in Canvas is easy.
Tip: If you’re having trouble determining how best to organize your content, reach out to your local instructional designer for help.
Step 2: Create your modules
Once you have your module breakdown conceptualized, you can begin creating the modules. To do so:

- Click on the Modules link in the course menu on the left.
- Click the +Module button at the top right of the Modules Index page. A dialog box will pop up.
- Type in the name for the module. You can set any additional settings now or come back later. Click the Add Module button to save.
Repeat the process to create additional modules. Remember to use a consistent naming convention from module to module to increase findability and usability in your course.
Step 3: Add items to your modules
Within each module, you can add the materials, assessments, or activities that students will need to complete in that module. You can add existing items, or you can create new ones via the steps below.
Note: For right now, don’t worry about creating the actual content -- just create any new pages, assignments, etc. as placeholders, and we’ll talk about filling in the page content later.
First, click the + button in the module heading.

A dialog box will pop up. From there:
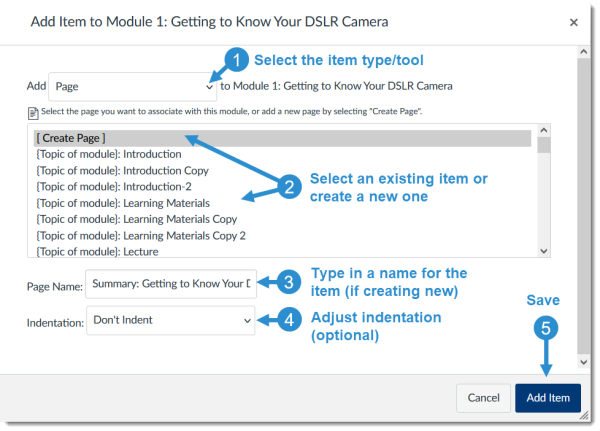
- Use the drop-down menu in the top left to select the type of item you want to add. In Canvas, you can add Pages, Assignments, Quizzes, Discussions, Files, Links, Text Headers, and External Tools as module items.
- Select an existing item from the course or click the [Create] option at the top of the list to create a new item.
- If you chose to create a new item, type in the name. If you selected an existing item, skip this step.
- Adjust the indentation level if desired.
- Click the Add Item button to save.
Tip: When you add items to a module, they are added at the bottom. You can click the dots to the right of any item and drag and drop it to the desired position in the module.
Did you know? Modules don’t have to be flat lists -- you can add additional elements to help visually organize and present your content.
- Text Headers: You can use Text Headers to subdivide and label different parts of your module content. This is especially helpful for longer modules that span multiple weeks, as you could add a text header to label each week’s content.
- Indentation: You can choose the indentation level for each item you add to your module. This can be used to visually indicate hierarchies or relationships between module items. Another way instructors might use indentation is to indent just the assignments and activities, to draw students’ attention to the items they need to submit.
There are many ways you can leverage these visual cues. Whatever you decide to do, just remember to maintain consistency throughout the course.
Step 4: Configure module settings (optional)
Once you have created your modules and added items to them, you may want to adjust some module settings to control when and how students can access each module. Here’s an overview of the options, with links to full instructions.
- Publish or unpublish a module - You can choose what to publish at the module level and at the individual item level by clicking the corresponding circle icons on the right. Students cannot see unpublished items or modules at all.
- Edit a module - You can edit a module at any time by clicking the kebab (three dots) in the module heading, then clicking Edit from the menu.
- Lock a module - You can set date restrictions on modules, so that they will automatically release to students at a specific date and time. Students can see published, locked modules and items on the Modules Index page, but cannot click on the items in them until they unlock.
- Add prerequisites to a module - You can specify whether students must complete items in a previous module before moving to the next one. Note that this feature works in tandem with requirements.
Add requirements to a module - You can specify required items in the module, which creates a checklist of sorts for your students. Not only will Canvas automatically add action labels for each item (view, submit, contribute, etc.), but it will also check off each item as students meet the requirements. This can help students keep track of their progress and see at a glance what they’ve completed and what they still need to do.
Here's an example of what a module with requirements set looks like for students:
Phew, you made it through! Hopefully you learned something new about Canvas Modules. Keep an eye out for the next topic in our IMPROVE Quick Tips Series (Pages Overview), which will pick up right where we left off this time.