How to Add Alt Text in Microsoft (PC/Windows)
What is Alt Text
Alternative (alt) text is a brief description of an image that allows people using screen readers to understand its content and purpose. It is read aloud by screen readers and displayed if an image does not load, helping make visual information accessible to users with visual impairments.
This guide explains how to add alt text to images in Microsoft tools on a PC.
Step 1: Select the Image and Open the Alt Text Pane
- Open your file in Microsoft Word, PowerPoint, or Excel.
- Click once on the image you want to describe.
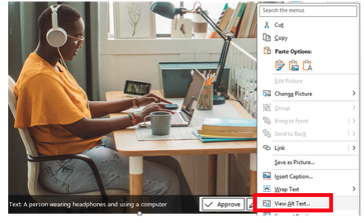
- Right-click on the image.
- Select View Alt Text from the menu.
- The Alt Text panel will open on the right-hand side of the screen.
Step 2: Add the Alt Text
- In the Description box, you will find AI-generated alt text. Be sure to review the alt text and edits as needed to convey the meaning of your photo. Tip! No need to type "Image of" or "picture of." The screen reader already recognizes that it is an image.
- If the image is purely decorative and does not add information, check Mark as decorative at the bottom of the Alt Text pane.

Step 3: Close and Save
- Close the Alt Text pane.
- Save your document to keep the alt text.