Creating Descriptive Links in Microsoft Word (Mac)
Descriptive links are essential for accessibility and navigation. Screen reader users often navigate documents by scanning a list of links, so each link should clearly describe where it will take the reader - even when read out of context.
Accessible links help students:
- Understand the purpose of a link before opening it
- Navigate documents more efficiently using assistive technology
- Find important course content quickly and confidently
This guide will provide information and steps for creating descriptive links in Microsoft Word on a Mac.
1. Write Descriptive Link Text
Use link text that clearly describes the destination or action.
Examples:
- Read the full course syllabus
- Watch the Week 3 lecture video
- Download the assignment rubric
Avoid:
- Click here
- More info
- This link
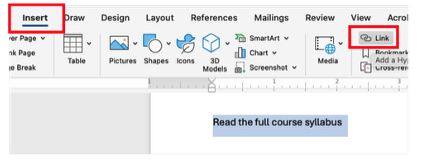
2. Insert a Link Using Word's Built-in Tool
- Select the descriptive text you want to turn into a link
- Go to Insert > Link (or Press Command + K)
- Paste the URL into the Address field
- Select OK

3. Avoid Using Full URLs as Link Text
The visible text should describe the destination - not display the raw URL. Screen readers will read every character in a URL, which can be confusing and time-consuming.
Instead of:
Use:
- Read the full course syllabus (PDF)
4. Use Consistent Language for Repeated Links
If the same destination appears multiple times:
- Use the same descriptive link text each time
- This builds familiarity and reduces confusion
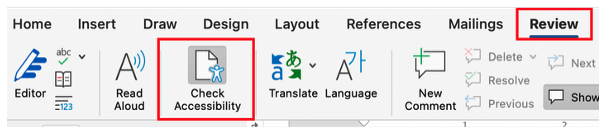
5. Check Links with Word's Accessibility Checker
- Go to Review → Check Accessibility
- Review any link-related suggestions
- Update vague or unclear link text as needed
Quick Checklist: Descriptive Links in Word
Before sharing your document, confirm:
- Link text clearly describes the destination
- No links say "click here" or "more info"
- URLs are not used as visible link text
- Run the Accessibility Checker and update any vague or unclear text