How to Create Descriptive Links in Canvas
Descriptive links are essential for accessibility and navigation. Screen reader users often navigate documents by scanning a list of links, so each link should clearly describe where it will take the reader - even when read out of context.
Accessible links help students:
- Understand the purpose of a link before opening it
- Navigate documents more efficiently using assistive technology
- Find important course content quickly and confidently
This guide will provide information and steps for creating descriptive links in Canvas.
1. Write Descriptive Link Text
Use link text that clearly describes the destination or action.
Examples:
- Read the full course syllabus
- Watch the Week 3 lecture video
- Download the assignment rubric
Avoid:
- Click here
- More info
- This link
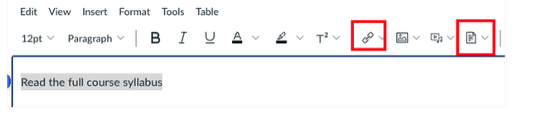
2. Create Links Using the Rich Content Editor
- Type the descriptive text you want students to see
- Highlight the text
- Select the Link or File icon in the Rich Content Editor depending on whether you are linking to a website or a document. Then, pload the file or paste the URL.
3. Avoid Using Full URLs as Link Text
The visible text should describe the destination - not display the raw URL. Screen readers will read every character in a URL, which can be confusing and time-consuming.
Instead of:
Use:
- Read the full course syllabus (PDF)
4. Provide Multiple Ways to Access Important Content
Whenever possible, give students more than one way to reach key course materials. Different students navigate Canvas in different ways, and multiple access points improve usability for everyone.
Examples include:
- Linking to important assignments in Modules and also in the course navigation menu
- Including links to key resources on the Homepage and relevant Assignments or Announcements
5. Use Consistent Language for Repeated Links
If the same destination appears multiple times:
- Use the same descriptive link text each time
- This builds familiarity and reduces confusion
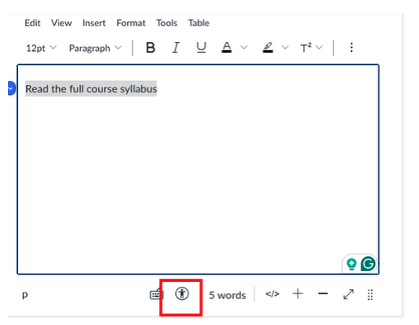
6. Check Links with the Canvas Accessibility Checker
- Open to the Rich Content Editor and find the Accessibility Checker option from the bottom.
- Review any link-related suggestions
- Update vague or unclear link text as needed
Quick Checklist: Descriptive Links in Canvas
Before sharing your document, confirm:
- Link text clearly describes the destination
- No links say "click here" or "more info"
- URLs are not used as visible link text
- Run the Accessibility Checker and update any vague or unclear text