Accessible Video and Audio Media in Canvas
Accessible media supports students who are deaf or hard of hearing, those who rely on text-based alternatives, and learners accessing content in varied environments or with assistive technology.
When using video or audio in Canvas, provide captions for all videos, transcripts for audio-only files, and descriptions for visual-only content. Avoid autoplay, and ensure students can pause, stop, or mute all media so they can engage with content in a way that works best for them.
This guide will walk you through tips, best practices, and how-to steps for adding accessible media to Canvas.
1. Use Content That Is Already Captioned When Possible
When using videos or audios you did not create (such as publisher content, library media, or public videos), choose materials that already include captions or transcripts.
Before adding external media to your course:
- Verify that captions are available and accurate
- Confirm captions can be turned on by the student
- Avoid using media that does not provide captions or a transcript unless an accessible alternative is available
2. Provide Captions for All Instructor-Created Videos
All videos used in your course should include accurate captions, even if the video is short or optional.
At Kent State, instructors can use Kaltura Reach to generate captions. Captions are auto-generated and should be reviewed and edited for accuracy before publishing.
For a how-to on captioning through Kaltura Reach, view the separate guide specific to that topic.
If you are recording your own videos, consider writing a brief script or outline in advance. Scripting helps:
- Improve caption accuracy
- Reduce editing time
- Support clearer, more concise delivery
3. Embed Kaltura Media in the Canvas Rich Content Editor
After captions are added and reviewed in Kaltura, embed the media directly in Canvas so students can access captions and playback controls.
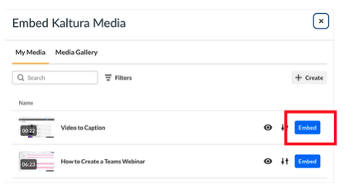
To embed Kaltura media in Canvas:
- Open the Page, Assignment, or Announcement in Edit mode
- Place your cursor where you want the media to appear
- Select the Kaltura icon in the Rich Content Editor
- Choose the media you want to embed
- Select Embed
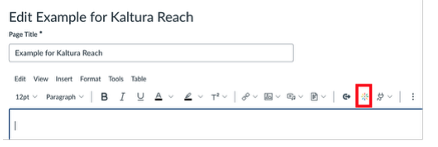
Embedding media (rather than linking externally) helps ensure captions and player controls are available to students.
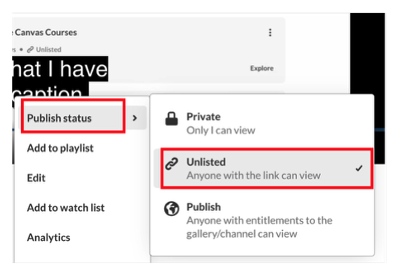
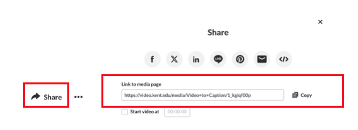
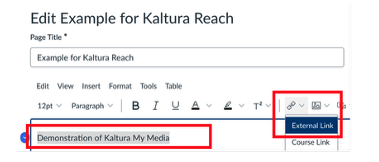
If you prefer to hyperlink your media:
- In Kaltura, be sure you navigate to the ellipsis menu beneath video and have set permissions to Unlisted otherwise students will not be able to view the video.
- Click Share beneath the video, and copy the Link to media page
- Return to Canvas and open the Page, Assignment, or Announcement in Edit mode
- Type a descriptive label for the video that will be used to create the hyperlink
- Highlight the label, click the link button, and choose External Link
- Paste the link into the Link field and click Done. Be sure to choose Save or Save & Publish at the bottom of the page to save your changes.
4. Include Transcripts for Audio-Only Files
For podcasts, narrated slides, or other audio-only content, provide a written transcript of the spoken content.
PDF vs. Word Document
- Word documents are preferred because they are easier to update and generally more flexible for assistive technology
- PDFs may be used if they are properly tagged and accessible
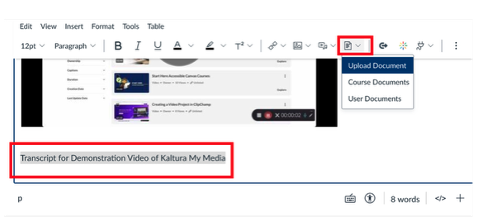
Attaching a Transcript File in Canvas
- Uploading the transcript as a separate file and link it near the audio. For example, navigate to the Page, Assignment, or Announcement in Edit mode.
- Create a descriptive label the link (e.g., Transcript for Descriptive Writing Lecture)
- Highlight the label, click the file button, and upload your file.
- Be sure to choose Save or Save & Publish at the bottom of the page to save the hyperlink.
5. Describe Video-Only Content
If a video includes important visual information without spoken narration. This ensures students who cannot see the video still understand the content.
- Add a text description near the video, or
- Include narration that describes the key visuals during playback
For Example:
- You have a video showing a step-by-step lab experiment, but there is no narration explaining the steps. Near the video, you could add a text description like:
- This video demonstrates how to safely light a Bunsen burner and measure liquid volumes using a graduated cylinder. First, the instructor adjusts the gas flow and ignites the burner. Next, they pour water into a cylinder, read the meniscus at eye level, and record the measurement. Key safety tips, such as keeping hair tied back and wearing goggles, are also shown on screen.
6. Ensure Students Control Media Playback
Students should always be able to control their media experience.
Best practices include:
- Allowing videos and audio to be paused, stopped, or muted
- Avoiding autoplay whenever possible
Unexpected media playback can be distracting or inaccessible for some students.
Quick Checklist: Accessible Media in Canvas
Before publishing, confirm:
- Videos include captions (either pre-captioned or instructor-added)
- Audio-only files have transcripts
- Visual-only content is described in text or narration
- Media can be paused, stopped, or muted
- Autoplay is avoided