This article originally appeared in the April 2022 edition of Inside Equal Access.
Webpages you’ll need to do the stuff discussed below: Creating Accessible Documents and its partner page Accessible Document Basics.
Fixing many accessibility issues starts with every teacher’s favorite saying, “USE YOUR RESOURCES!” Most of the top-tier software and platforms have built-in accessibility checkers, often with wizards that walk you through how to fix the found issues. This month, we’ll look at Microsoft’s office suite.
Finding the accessibility checker in Microsoft products isn’t hard to remember. When you look at the toolbar or ribbon options, pick the one that makes the most sense for what you need to do: REVIEW.
- Click REVIEW, then CHECK ACCESSIBILITY
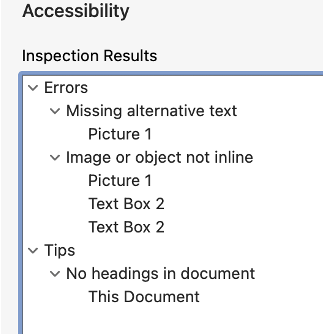
- Review the results panel on the right.
- Fix what you know how to fix. ("Nothing!" is a perfectly acceptable response. We've got you covered below.)
If you know about alternative text and headings, start moving through the document and adding those. Jump to #6 in this list if you already know how to fix those two issues. - If none of it seems like English, start with Alternative Text. Look at your images and diagrams. How would you explain those to someone who can’t see them?
Right-click on the picture/diagram and choose “Edit Alt Text”. Type the description into the box (erase what’s already there) then keep working in your document. You may click “mark as decorative” IF AND ONLY IF the image adds no additional meaning to your text. - Go to our Accessible Document Basics page that teaches what Headings are and how to add them. It’s not hard! Add those to your document.
- Click on any other issues in the right panel and read about each issue under the box. Choose one to apply to this document and all others you work on today. That’s the start of a new habit!
That’s it! Now someone using Assistive Technology will have a much easier time understanding the information you’ve created.
Want to save time next time? As you type, add headings. As you copy and paste images, add the alt text. When each new issue fix is a firm habit, learn another one and add it. If you forget how, pull up our Accessible Document Basics page. P.S. Bookmark it.
Want more? You need to attend the Creating Accessible Documents training. We’ll make you a pro in no time.