Structuring Documents in Microsoft Word with Headings and Lists (Mac)
Properly structuring a Word document with headings, lists, and consistent formatting makes it easier to read, navigate, and understand for all users, including those using screen readers. Screen readers rely on heading styles and lists to help users jump between sections, understand the order of content, and interpret documents correctly. Clear structure is essential for accessibility, professional appearance, and overall readability.
This guide will explore how to add headings, format lists, and other formatting considerations in Microsoft for Mac.
1. Using Headings to Organize Your Document
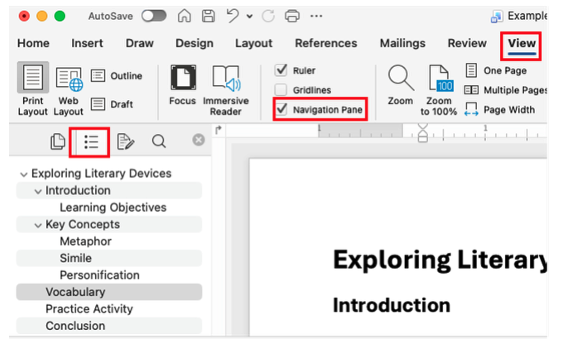
Headings create sections and subsections, allowing readers—and screen readers—to quickly find and understand information. They also make it easier to view your document’s structure in the Navigation Pane.
Steps to Apply Headings
- Select the text you want to make a heading.
- Go to the Home tab.
- In the Styles group, choose:
- Heading 1 for main sections
- Heading 2 for subsections of Heading 1
- Heading 3 for smaller subsections within Heading 2
- Repeat for all section titles.

To see your structure, go to View → Navigation Pane → Document Map. Headings appear in an outline for easy navigation.
Editing Heading Styles
You may wish to change the font style, size, color, formatting, etc. of the heading styles in Microsoft word. To do so:
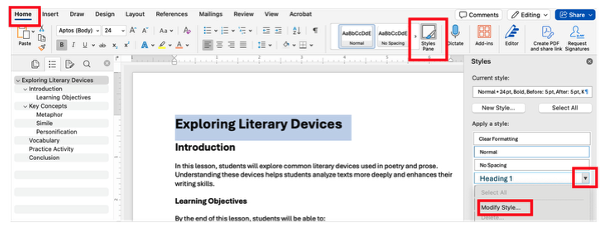
- From the Home tab, open the Styles pane, and click the drop-down arrow next to the heading style that you wish to edit (e.g., Heading 1).
- Select Modify Style.
- Change the font, size, color, or spacing as desired and click OK to apply changes throughout the document.

2. Using Bulleted vs. Numbered Lists
Bulleted Lists
Use when the order of items doesn't matter.
Example:
Vocabulary
- metaphor
- simile
- personification
Numbered Lists
Use when order does matter, such as steps or instructions.
Example:
- Read the poem provided in class.
- Identify all examples of literary devices.
- Explain in 1-2 sentences how each device contributes to the poem's meaning.
Steps to Create a List
- Highlight the text you want in a list.
- Go to Home → Bullets or Home → Numbering.
- Select the bullet or numbering option of your choice.
- Press Enter after each item to add a new bullet or number.
- Use Tab to create sub-levels (indented bullets or numbers).

Tip: Properly formatted lists allow screen readers to announce the number of items or indicate bullets, helping users follow the content accurately.
3. Using Consistent Font and Formatting
Consistency makes documents easier to read for everyone, including those using assistive technology.
Tips for Consistent Formatting:
- Choose one font for headings (e.g., Arial Bold) and one for body text (e.g., Calibri).
- Apply heading styles to maintain uniform size, color, and spacing.
- Avoid using multiple fonts or colors for body text unless emphasizing key points.
Summary
- Use Headings 1, 2, and 3 consistently to structure sections and subsections.
- Use bulleted lists for unordered items and numbered lists for ordered steps.
- Maintain consistent fonts throughout your document.
- Structured headings and lists improve navigation and readability for all users, including those using screen readers.